The Ultimate Guide to In-App Purchase in iOS Application Development: Part 3

October 30, 2019
This is the final article in our series dedicated to the implementation of in-app purchase (IAP) functionality in iOS applications. In our first part, we’ve talked about IAP types and standard lifecycle, along with business tasks and challenges we’ve faced while integrating this feature for our clients. The second part was dedicated to the technical aspects of in-app purchase function: it’s architecture, structure, and security measures that your development team should implement to ensure consistent performance. Today we’ll discuss our experience with the most popular in-app purchase libraries available on the market, their pros and cons, together with the actual reasons why we’ve decided to build our own solution and how it is realized into practice.
To illustrate the use cases of in-app purchase implementation, we’ll use our real-world examples: an application that needs the IAP feature to sell consumable products and a software solution that sells a subscription to give access to premium content. We started the development with the investigation of production-ready solutions, and our choice fell on RMStore and SwiftyStoreKit. Let’s take a closer look at each of these libraries.
Usage of ready-made in-app purchase solutions — pros and cons
RMStore
As RMStore developers say, this is:
“A lightweight iOS library for in-app purchases. RMStore adds blocks and notifications to StoreKit. All in one class without external dependencies.”
This statement is valid, except for the nuance. RMStore simplifies the work with in-app purchases so much that applying it for complex purchase flows in mobile apps becomes impossible. The library uses a ‘success’ and ‘fail’ completion of events asynchronously. What does this mean in simple terms? When a user makes a purchase, the iOS application expects a result — success or error. But, as it was said earlier, an IAP lifecycle is implemented as a queue, and it waits for a response for some time, that’s why an app may receive several answers in a row. Thus, expecting a ‘success’ or ‘fail’ as the only relevant answer, iOS developers should take this issue into account and enable the system to store and update statuses independently. Due to this, app users may miss a lot of important information, and latency can be far from good, thus casting a shadow over the user experience.
But the main disadvantage of RMStore library comes out of its advantage — it validates purchases locally and requires OpenSSL dependency for this validation. Since the library itself is quite old — the dependency has been added to it by a method that doesn’t work with new methods of adding dependencies. It was the critical factor that made us deny RMStore library usage for ios in-app purchase development.
SwiftyStoreKit
As SwiftyStoreKit developers say, this is:
“a lightweight in-app purchases framework.”
SwiftyStoreKit library for iOS in-app purchases is very similar to RMStore, but better adapted to the real-world tasks. The library is written in Swift, however, it still uses a closure-based approach. One key feature of SwiftyStoreKit is the implementation of a receipt validation via App Store (sending a direct request to Apple server from an app). The same approach is used for a subscription validation in SwiftyStoreKit, as well. We will talk about the pros and cons of such an approach to validation later in this article.
Comparison of iOS purchase ready-made and native StoreKit framework
So let’s take a look at some features of the two mentioned libraries and compare them to the raw and native StoreKit:

As we can see, neither one of the in-app purchase libraries comes with all the features required by the IAP lifecycle. To get access to all necessary functions, development teams often add new integrations and connect third-party tools, which, in turn, contribute to overall code complexity, project duration (cost), and final product size.
Requirements and expectations for iOS in-app purchases
Expectations which existing iOS in-app purchase libraries do not cover
Here is a list of things that, in our opinion, are unsatisfactory in in-app purchase libraries, when choosing an in-app purchase library for the next mobile app development project:
- Synchronous execution. It means that the library interface has only two outputs — error and success, even though there are several more flows in the real world.
- Singleton as the main architectural pattern. It means there is only one access point to the library interface, and this single point contains all the possible functions. There is no way to create a separate instance for working with specific functions, such as the validation of purchases or processing subscriptions.
- Lack of convenient data structures required for regular tasks. For example, for displaying a list of available products or previous user’s purchases.
- Absence of the purchase list. It is not possible to get a purchase list without requesting a server and without using deprecated methods.
Development requirements for a custom iOS in-app purchase library
Well, you may decide to develop a custom iOS in-app purchase solution, so let’s define development requirements for the new purchase library to make it functional and convenient for iOS engineering teams.
- Support of asynchronous execution and notifications about in-app purchases lifecycle events (for example, restoring purchases, requests of a list of products, etc.).
- The ability to create different instances for separate tasks that would work independently from each other.
- Storage of lists of products and purchases, as well as the ability to replace its internal implementation (with more secure one, for example).
- Local validation of in-app purchase receipts. There is a need to provide a way to validate purchase results data locally and organize easy access and storage of that data.
- Filtration of data in storage.
- An ability to replace components with mocks, for testing purposes, as an example.
- Availability of a testing application to check new features before release.
Distribution of a custom in-app purchase library & its usage in the real-life projects
As soon as many ready-made solutions for in-app purchase do not fulfill the expectations of the real apps at full extent, there occurs a gap between business needs and solutions. Working with clients on iOS app development, and looking for the way to match business requirements with technical implementation, our sci-tech team decided to address this challenge. A custom in-app purchase library is available for free usage on GitHub under the MIT license. We have utilized our custom library as the base when implementing in-app purchase functionality for our clients on the recent iOS app projects. We have utilized our custom library as the base when implementing in-app purchase functionality for our clients on the recent iOS app projects, where one company sells consumables through their solution, while another offers a subscription to their premium services.
Dashdevs’ custom in-app purchase library readme & CocoaPods guide
Dashdevs’ PurchaseController can be installed using CocoaPods and for detailed instructions, you can refer to their guides. To integrate PurchaseController, include the following in your project’s Podfile:
pod 'PurchaseController'
Moreover, you can discover the capabilities and basic functionality of the custom in-app purchase library. If you would like to see how the library works first, clone the project from GitHub repo and run it from the /Example directory:
$ pod install
Pre-configurations list to implement in-app purchase library
Implementation of in-app purchases requires some configuration setup to be made:
You have to review and sign the Paid Applications Agreement and provide your banking information in the Agreements, Tax, and Banking sections of your App Store Connect account. App Store Connect Help: Agreements, tax, and banking overview
Then you need to create an application or use an existing one on Apple Developer portal.
Add the application to your App Store Connect account. App Store Connect Help: Add an app to your account
Add IAP (in-app purchasable) products to your app. Navigate to your app page on App Store Connect and open Features section. By clicking “+” you can add new products to the app. You should note Product IDs as you will need them further. App Store Connect Help: Create an in-app purchase

Add a sandbox tester. It is required for testing of the IAP services without charging money from a real Apple ID account. For this case, navigate to Users & Roles on the App Store Connect, select Sandbox Testers section, and click “+” to add a new tester. App Store Connect Help: Create a Sandbox Tester Account
The next step is to open PurchaseController.xcworkspace and set your app’s bundle ID in Target Settings:

Open PurchaseProductItem.swift and add your product IDs as enum cases:
enum PurchasebleProductItem: String, CaseIterable { case invalid = "com.myapp.invalid" static func allAsRaw() -> Set{ let values = PurchasebleProductItem.allCases.map { $0.rawValue } return Set(values) } } Launch the app on a real device. You can start from retrieving the products list. All states are logged to the console.

DashDevs case study of an iOS app selling consumable products
This client’s app offers a quite basic in-app purchase functionality. This client’s app offers a quite basic in-app purchase functionality: in fact, users add funds to their account balance to get access to premium functionality, namely live chat
Despite that, there’s a challenge in synchronization of purchases between the app and the server, along with providing data consistency in cases of unexpected app exits, network connection errors, etc. The deployed solution consists of the PurchaseOperation class, which implements the Facade pattern, wraps the whole purchase flow, and has a simple programming interface — start() method, which has a self-descriptive name and updates the caller with onSuccess(purchase) and onError(error) callbacks.
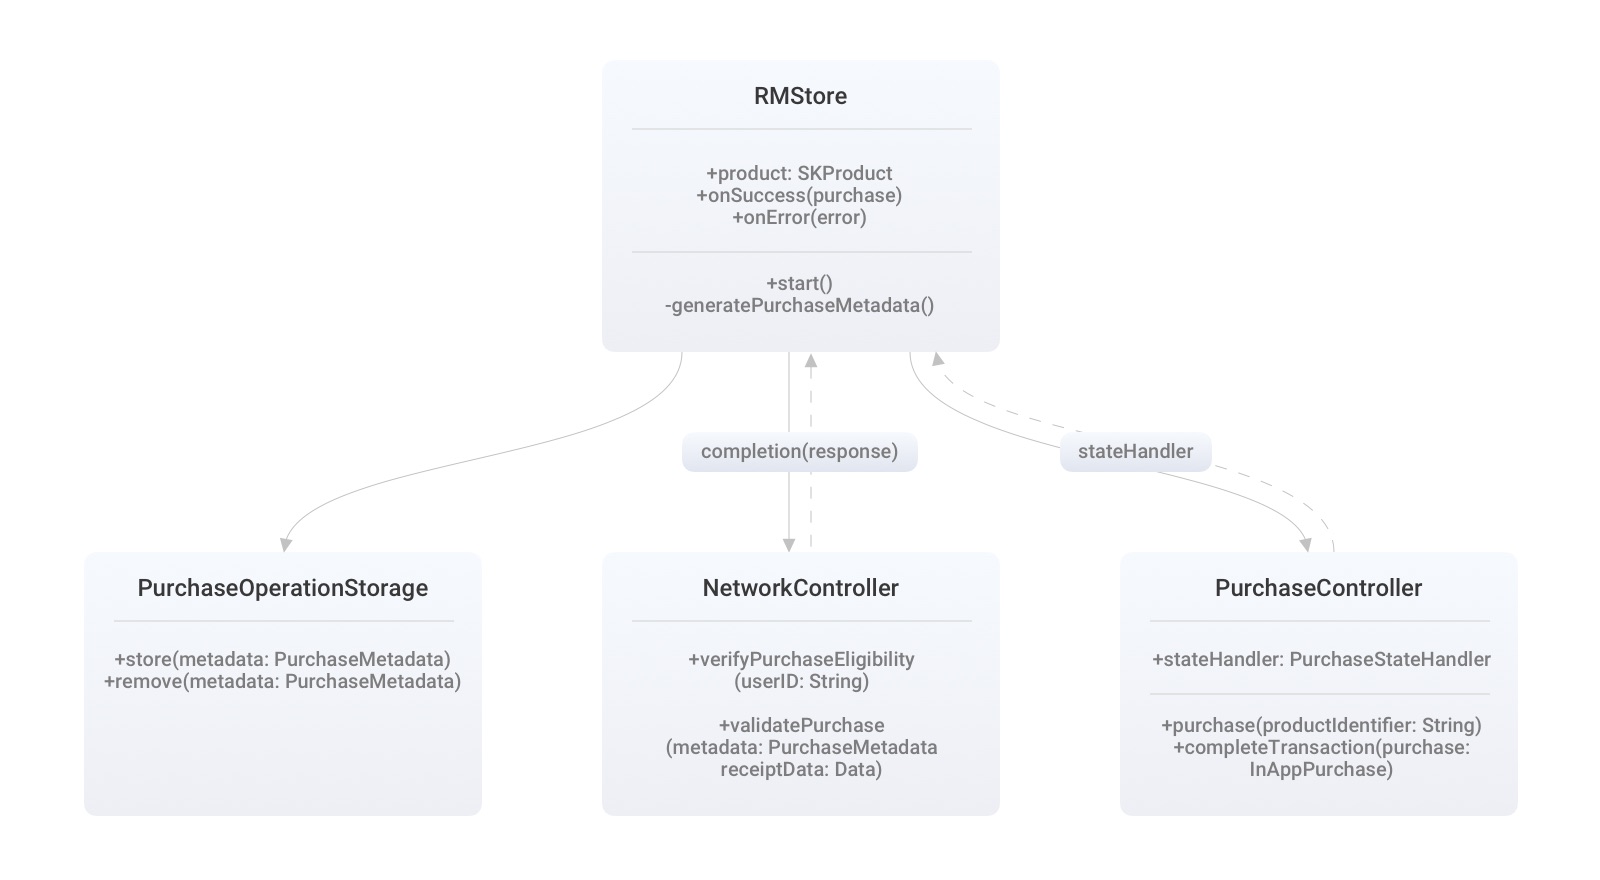
The default flow of in-app purchase operations
- Create an instance of PurchaseOperation when an app user wants to purchase a SKProduct.
- NetworkController verifies in-app purchases eligibility for a current app user. The server response also contains purchase metadata to be used in further steps.
- PurchaseController interacts with the App Store to buy the requested product.
- Once the product is successfully purchased, the PurchaseOperation class generates a purchase metadata instance.
- PurchaseOperationStorage saves the purchase metadata in Keychain, so it persists in an encrypted form between app reinstalls.
- NetworkController validates the purchase with the server, sending previously-stored metadata and encoded in-app purchase receipt from the app bundle. This step follows with the App Store receipt validation approach, described in the Chapter 6 above.
- After the purchase is successfully verified with the server, PurchaseOperationStorage removes the stored metadata since it’s not needed anymore.
- PurchaseController finishes the transaction.
- PurchaseOperation calls success callback to inform the application that the purchase is successfully finished.
Handling errors for in-app purchases
Extensive error handling is performed to deliver a purchased product to a user and to sync up with a server in case of any issue.
- If any error appears before the requested SKProduct product is purchased (step #4), it is simply returned to a caller of PurchaseOperation by an error callback.
- If any error appears during the last step — a server purchase validation, on the next app start, it attempts to finalize the purchase by repeating steps 6-9.
DashDevs case study of iOS app offering subscription content
This app offers subscription functionality as in-app purchases. The main requirement for the iOS app is that a user should be able to purchase premium monthly content with an auto-renewable subscription.
In this case, the business logic of the app depends on the user’s subscription availability. Thus the subscription availability check runs when the app is launched. Also, there was one more challenging requirement, a client needed to implement the in-app purchase functionality as fast as possible.
For subscription validation, we should verify a receipt. At first, we tried a remote receipt validation with SwiftyStoreKit, and it took 3.1422 seconds approx, then we tried to use a local receipt validation, and it took 1.2552 seconds.
As soon as we knew that the local validation ran obviously quicker, we used this validation method on a mobile client. The app received a decrypted receipt, and it wasn’t difficult to find an active subscription in the receipt.
We used a method validateSubscription and passed a filter closure to this method. The options used to find a valid subscription:
- purchaseDate
- expirationDate
- cancellationDate
- autoRenewStatus, etc.
If an active subscription is not found, a client will receive an empty result, meaning an iOS app user needs to purchase a subscription to premium content.
DashDevs case study of a subscription service
This case is a project where SDK works with remote environments via API. The basic functionality was to provide user interaction with Subscriptions (both, auto-renewable and non auto-renewable).
By the time Dashdevs experts started the implementation, the PurchaseController pod was in the development process, and that’s why we used classes directly and added them manually to SDK.
The main goal was to create Subscriptions, handle their states, and send all changes from the API to the server. SubscriptionManager has become responsible for the purchases functionality, only that class interacts with PurchaseController classes.
To ensure proper operation of subscriptions, a user should setup Subscription in the project’s admin panel with the same parameters as they are set in Apple Connect in-app purchases. For example, the settings may be product ID, price, and duration. To create Subscription, we have used the method purchase of PurchaseController with the specific product ID. We have added the parameter isSandbox to a project which provides a user with the possibility to setup type of Apple In-App purchases environment (Sandbox or Production).
According to business logic, a subscription should be validated at every start of the application, that’s why the method isSubscribedToSite has been added. This method verifies a purchase receipt and then decodes it. If receipt decoding was successful, the app retrieves available products for a user. Products retrieving is followed by the synchronization of local purchases from a receipt. As a result, there will be a PurchaseItem list that is sorted by transactionDate, and then it is checked against the list with the data from the server-side. Cancellation of the invalid subscriptions is performed using the API method.
Backlog of features for the custom in-app purchase library
We have developed a custom in-app purchase library to have a sufficient solution to meet the needs and goals of several models of different business iOS apps. There are a lot of improvements to do for our in-app purchase controller’s backlog such as add more distribution channels (Carthage, SPM, etc.), add SKDownloads functionality, and improve obfuscate code.
Dashdevs custom purchase library is available at GitHub under MIT license. Try it. Hope to hear your feedback.
Share article
